
These instructions describe how to change the engine oil and filter on cars with a Rover K series engine.
Note: Used engine oil must be disposed of properly. Most areas have recycling facilities that are suitable. Do not under any circumstances pour used engine oil into the sewer or drainage system.
NOTE: ANY WORK THAT YOU PERFORM ON YOUR OWN OR SOMEONE ELSE'S CAR IS ENTIRELY YOUR OWN RESPONSIBILITY. PLEASE DO NOT ATTEMPT THIS WORK IF YOU ARE NOT CONFIDENT YOU CAN COMPLETE IT SAFELY. ALWAYS FOLLOW GOOD WORKING PRACTICES AND NEVER TAKE RISKS OR SHORT CUTS. WHILST EVERY EFFORT HAS BEEN MADE TO ENSURE THAT THESE INSTRUCTIONS ARE COMPLETE THEY SHOULD ONLY BE CONSIDERED A GUIDE - NO GUARANTEE IS MADE THAT THEY ARE COMPLETE OR EXHAUSTIVE.
PLEASE READ THESE INSTRUCTIONS THROUGH COMPLETELY AND THOROUGHLY BEFORE STARTING THE WORK. IF YOU ARE IN ANY DOUBT OR HAVE ANY QUESTIONS PLEASE CONTACT US AT instructions@tadts.com.
If you have any comments/suggestions or notice any errors/omissions please let us know at instructions@tadts.com.
General working recommendations
When removing parts from a car it is always a good idea to place them in a container rather than leaving
them on the floor. This reduces the risk of damaging them by treading on them and also keeps them cleaner
and easier to move around. Something like an old metal tray or biscuit tin is ideal - large enough to hold
most parts, strong enough to take the weight and robust enough to last.
Be methodical about the work and wherever possible work on a small part of the car at a time. This will help you be able to remember what you have done so that reassembly is easier.
Try and be tidy as you work - put tools back on a bench/in a box as they can be dangerous left lying around on the floor and are more difficult to find.
Please read these instructions through thoroughly before starting the work. If you have any questions/comments please feel free to contact us at the email address given at the top of the page.
Estimated time required: 2 hours 20 minutes
Please note that this estimated time is a rough guide and is based on a relatively inexperienced person
performing the task for the first time. It should cover most 'worst-case' scenarios and you will
probably find you complete the task in much less time.
Tools required
| - Suitable jack and protective pad (e.g. a piece of wood) | - Two chocks (e.g. house bricks) |
| - Four ramps | - Container for used engine oil |
| - Strap wrench/chain wrench | - Funnel (e.g. old water bottle) |
| - 8mm socket | - 13mm socket |
| - 6mm allen key bit | - Socket handle and extension bars |
| - 15mm socket | - Torque wrench |
Materials required
| - Newspaper | - Rag/cloth/tissue |
| - New engine oil filter | - Oil (for oil filter sealing ring) |
| - New engine oil sump plug washer | - Clean lint-free cloth/tissue/rag |
| - 4 litres of oil | - An assistant! |
| - Copper grease | - Oil (for topping up engine) |
Torque settings
| - Engine oil sump plug (K series) 25 Nm |
The best way to warm the engine oil is drive the car normally for 30 minutes or so. The time required to bring the engine oil up to normal
operating temperature will vary with driving conditions and ambient temperature but a very rough guide is at least three times as long as the
coolant takes to reach it's normal operating temperature.
However the engine oil can be warmed by simply allowing the engine to idle for a sufficiently long period of time. To do this start the
car (ensuring that the handbrake is firmly on if the wheels are on) and that the gearbox is in neutral.
Wait until the radiator fan cuts in. This should mean the coolant has reached it's maximum temperature. The engine can now be switched off
and the oil should be warm.
![]() Whenever an engine is left idling ensure there is adequate ventilation for the exhaust fumes.
Whenever an engine is left idling ensure there is adequate ventilation for the exhaust fumes.
Tools required
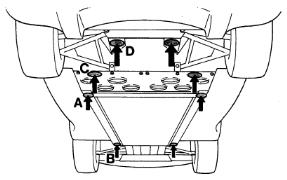
The Elise has a single jacking point each side that raises both wheels on one side at the same time. This should be
marked with a blue and white sticker with a picture of a trolley jack on it (point A in the diagram).
If the car you are working on does not have this sticker the correct jacking point is on the main
chassis rail at the point where the cockpit floor and engine undertray meet.
When raising the car use a piece of wood or similar to protect the chassis from direct contact with the saddle
of the jack.
It is preferable to have the car raised and level whilst working on it. A good way of achieving this is to use
four ramps - one under each wheel - to get the car high enough to work under.
Before raising the car, firmly apply the handbrake and chock the wheels on the opposite side to the one
you are going to raise. Carefully line up the jack up at the correct point and start to lift. Continue to raise
the car sliding the ramps under the two raised wheels as you do so (ensuring that they face opposite directions
to reduce the chance that the car will roll off) . Once you have raised it a small amount, lower the jack and
repeat on the other side. Continute raising each side in turn until all four wheels are resting on top of the
ramps.
Once the car is raised high enough to rest on top of the ramps it is a good idea to place the ramp under the front wheel with it's slope facing forwards and the ramp under the rear wheel with it's slope facing backwards. This helps to ensure the car cannot roll off the ramps and also gives better access when removing the undertray.
![]() Never work under or near a car that is only supported on a jack. Always use some additional means of
support such as ramps. Even a full box of paper under the chassis rail is sufficient.
Never work under or near a car that is only supported on a jack. Always use some additional means of
support such as ramps. Even a full box of paper under the chassis rail is sufficient.
- Suitable jack and protective pad (e.g. a piece of wood)
- Two chocks (e.g. house bricks)
- Four ramps
![]() Since there is no way of securely locating the jack on an Elise be careful about raising one side too much
higher than the other as there is a chance that the jack will slip out causing injury and damage the sill.
Since there is no way of securely locating the jack on an Elise be careful about raising one side too much
higher than the other as there is a chance that the jack will slip out causing injury and damage the sill.
![]() When placing the jack and protective pad ensure that you place it directly onto the flat surface of the
chassis rail and not onto any the fixings that are in that area.
When placing the jack and protective pad ensure that you place it directly onto the flat surface of the
chassis rail and not onto any the fixings that are in that area.
Tools required
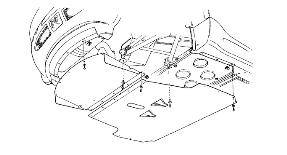
The engine undertray is held in place by 11 8mm hex head bolts and either two
13mm hex head bolts or two 6mm cap head bolts .
There are three 8mm hex head bolts on each side just in front of the rear wheels and five
8mm hex head bolts joining the undertray to the diffuser panel.
The easiest way to remove the undertray single-handed (it is quite an unwieldy item once removed) is to remove
all 11 8mm hex head bolts and then lie under the car with your feet pointing forwards.
Loosen both the remaining bolts and then raise your feet so that they are supporting the leading (front-most)
edge of the undertray. Use one hand to take the weight of the undertray and the other to remove the remaining
bolts. Once the bolts are removed carefully pull the undertray backwards until it clears the lip at its front
edge.
Once you have the undertray resting on your body/legs, slide it either out to the side or forwards as
appropriate.
- 8mm socket
- 13mm socket
- 6mm allen key bit
- Socket handle and extension bars
![]() The undertray is likely to have debris resting on its top surface which may fall into your eyes/face
if you lower the trailing edge too much.
The undertray is likely to have debris resting on its top surface which may fall into your eyes/face
if you lower the trailing edge too much.
![]() Be aware that the engine and exhaust system may be very hot so ensure you are very careful when draining the engine oil.
Be aware that the engine and exhaust system may be very hot so ensure you are very careful when draining the engine oil.
Tools required
Materials required
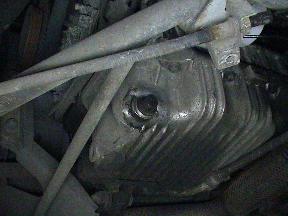
The engine oil sump drain plug is located on the forwards-facing face of the sump as shown in the photograph.
Gather some rag/cloth/tissue to mop up any spills and use a 15mm hex head
socket to loosen the drain plug. Place a suitable container under
the drain plug as close to it as possible (i.e. raise the container if required) to reduce the chance that hot oil will
splash onto you or the floor.
If the right rear road wheel has been removed you can reach the drain plug over the wishbone. This means that
when the drain plug is removed the hot oil will not run down your arm.
Carefully remove the drain plug and allow the oil to drain into the container.
![]() Engine oil can cause problems when it comes into contact with skin and at normal operating temperature is very hot. Take adequate
precautions to protect yourself and work area from spillages and splashes. If you have latex gloves wear two pairs when dealing with hot
oil as this provides sufficient thermal protection for short-term contact.
Engine oil can cause problems when it comes into contact with skin and at normal operating temperature is very hot. Take adequate
precautions to protect yourself and work area from spillages and splashes. If you have latex gloves wear two pairs when dealing with hot
oil as this provides sufficient thermal protection for short-term contact.
- 15mm socket
- Socket handle and extension bars
- Container for used engine oil
- Newspaper
- Rag/cloth/tissue
 Ensure the area around the oil filler cap is clean and free from debris and remove and then rest it back in place at an angle. This is to
ensure that when the oil drains there is no 'vacuum' to slow down the flow. Cover the work area with sheets of newspaper in case any
oil escapes the container.
Ensure the area around the oil filler cap is clean and free from debris and remove and then rest it back in place at an angle. This is to
ensure that when the oil drains there is no 'vacuum' to slow down the flow. Cover the work area with sheets of newspaper in case any
oil escapes the container.
![]() Bear in mind that when the drain plug is first removed the flow will be high and so be ready to move
the container to 'catch' it. You may find you need to move the container as the flow reduces.
Bear in mind that when the drain plug is first removed the flow will be high and so be ready to move
the container to 'catch' it. You may find you need to move the container as the flow reduces.
Tools required
Materials required
The engine oil filter is located just in front and above the drain plug.
To remove the oil filter use either a strap wrench or a chain wrench. Place the tool around the body of the
filter as close as possible to the oil filter housing and gently loosen it. At this stage do not remove it
completely - just undo it enough that you can turn it by hand.
If you are already draining the sump move the container so that it is under both the drain plug and filter otherwise
place a suitable container under the filter as close as possible to the filter (i.e. raise the container if required) and cover the work area with sheets of newspaper in case any oil escapes the container.
Gather some rag/cloth/tissue to mop up any spills. Now
carefully undo the filter until a trickle of oil starts to flow out. At this point stop undoing it and allow
the trickle to stop - this will reduce the amount of oil in the filter. Now remove the filter completely and
place it somewhere suitable (into the container that is collecting the oil is best).
- Container for used engine oil
- Strap wrench/chain wrench
- Newspaper
- Rag/cloth/tissue

![]() When loosening the oil filter be careful that it does not drip oil into your face/eyes.
When loosening the oil filter be careful that it does not drip oil into your face/eyes.
![]() The oil filter will have some oil left in it. Take care when removing it from the filter housing. It is best to turn it so the end that was on the housing is pointing upwards as soon as possible.
The oil filter will have some oil left in it. Take care when removing it from the filter housing. It is best to turn it so the end that was on the housing is pointing upwards as soon as possible.
Tools required
Materials required
It is always a good idea to allow as much of the old oil to drain from the engine when carrying out an oil change.
Therefore it is a good idea to leave the engine oil draining for as long as possible. 30 minutes should be enough assuming the engine
oil was sufficiently hot when it is drained.
A good rule of thumb is to leave the engine oil to drain until just occasional drips are seen from the sump and/or filter housing.
- Container for used engine oil
- Newspaper
Materials required
Before refitting the engine oil filter ensure that the filter housing is completely clean. This will ensure that
no contamination will enter the oil system and also that the new filter will be allowed to seat properly and
not leak.
Put a thin smear of oil on the sealing ring (to make sure that it does not 'snag' when being tightened) and
put the new filter onto the housing.
Tighten by hand only - do not use any tools.
- New engine oil filter
- Oil (for oil filter sealing ring)
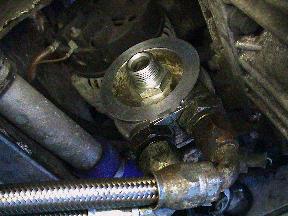 Note that the car in the photograph also has a sandwich plate and two braided pipes fitted that are part of
an oil cooler so the car you are working on may not have these.
Note that the car in the photograph also has a sandwich plate and two braided pipes fitted that are part of
an oil cooler so the car you are working on may not have these.
Tools required
Materials required
Torque settings
Always use a new engine oil sump plug washer as this will ensure that you don't have a leak from the engine oil sump plug.
Before refitting the engine oil sump plug ensure that the area around the drain hole is completely clean. This will ensure that
no contamination will enter the oil system and also that the sump plug will be allowed to seat properly and not leak.
Thoroughly clean the engine oil sump plug (including the threads) and place the new sump plug washer onto it.
Tighten the sump plug to 25 Nm.
- 15mm socket
- Torque wrench
- New engine oil sump plug washer
- Clean lint-free cloth/tissue/rag
- Engine oil sump plug (K series) 25 Nm
Tools required
Materials required
The capacity of the oil system on the Elise is quoted at 4.5 litres however it seems that it is never possible
to put this amount in - it is always less (around 3.75 to 4 litres is normal).
Allow a short time for this to enter the sump and check the level on the dipstick. The difference between the
minimum and maximum marks on the dipstick is quoted at one litre. Use this guide to add more oil as required.
Replace the oil filler cap and tighten it securely by hand.
Reconnect the fuel injector connector.
- Funnel (e.g. old water bottle)
- 4 litres of oil
- An assistant!
- Rag/cloth/tissue
![]() Some derivatives (such as some S160 models) have an oil cooler fitted so the amount of oil required to fill
these cars will vary.
Some derivatives (such as some S160 models) have an oil cooler fitted so the amount of oil required to fill
these cars will vary.
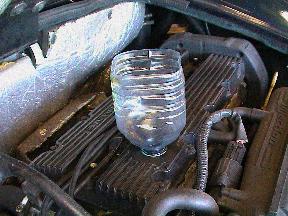 Remove the dipstick to allow the system to vent as the new oil enters and using a suitable funnel (one can be
made from an old water bottle as shown) pour approximately 3 litres of oil into the engine.
Remove the dipstick to allow the system to vent as the new oil enters and using a suitable funnel (one can be
made from an old water bottle as shown) pour approximately 3 litres of oil into the engine.
![]() It is a good idea to get an assistant to hold the funnel as you pour the oil to prevent the funnel falling over and spilling
oil over the top of the engine. Also if you hold the oil container sideways (i.e. with the outlet at the side rather than at the bottom) it will 'glug' less.
It is a good idea to get an assistant to hold the funnel as you pour the oil to prevent the funnel falling over and spilling
oil over the top of the engine. Also if you hold the oil container sideways (i.e. with the outlet at the side rather than at the bottom) it will 'glug' less.
![]() It is also a good idea to have some rag/cloth/tissue easily to hand so that you can immediately clear up any spills or drips.
It is also a good idea to have some rag/cloth/tissue easily to hand so that you can immediately clear up any spills or drips.
![]() At this stage as long as the level on the dipstick is somewhere between the minimum and maximum marks do not
pour any more in. Overfilling with oil will require the drain plug to be removed. The level can be checked once
the car has been lowered to the ground and the oil given a chance to circulate.
At this stage as long as the level on the dipstick is somewhere between the minimum and maximum marks do not
pour any more in. Overfilling with oil will require the drain plug to be removed. The level can be checked once
the car has been lowered to the ground and the oil given a chance to circulate.
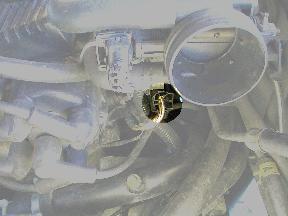 Disconnect the electrical connector to the fuel injectors (the three-wire connector in the middle of the photograph below
the throttle body). Now turn the engine over on the starter motor until the oil pressure warning light goes out.
This is to ensure that the oil system is full of oil before the engine starts.
Disconnect the electrical connector to the fuel injectors (the three-wire connector in the middle of the photograph below
the throttle body). Now turn the engine over on the starter motor until the oil pressure warning light goes out.
This is to ensure that the oil system is full of oil before the engine starts.
Tools required
Materials required
To refit the engine undertray lie under the car with your feet pointing forwards ensuring that you have the
two 13mm hex head bolts or 6mm cap head
bolts easily to hand.
Slide the undertray onto your body/legs and using your feet raise the leading (front-most) edge and push it
forwards into its 'slot' at the rear of the cockpit floor. Now insert the two 'main' bolts but do not completely
tighten them at this stage.
Replace the remaining 11 8mm hex head bolts but again do not completely tighten them as you
may well need to move the undertray slightly to get some of the bolts in.
Once all the bolts are in, lie under the car again and pushing the undertray forward into its 'slot' with
one hand fully tighten the two 'main' bolts. Now fully tighten the five bolts joining the undertray to the
diffuser and then fully tighten the three bolts on each side.
- 8mm socket
- 13mm socket
- 6mm allen key bit
- Socket handle and extension bars
- Copper grease
- Rag/cloth/tissue
![]() It is worth putting a little copper grease or similar on all the undertray bolts before refitting them as it will help with
subsequent removal.
It is worth putting a little copper grease or similar on all the undertray bolts before refitting them as it will help with
subsequent removal.
![]() Be careful when tightening the 8mm hex head bolts as they are only held in place by spire
nuts. As long as the undertray is held firmly that is sufficient.
Be careful when tightening the 8mm hex head bolts as they are only held in place by spire
nuts. As long as the undertray is held firmly that is sufficient.
Tools required
Lowering the car is the reverse of raising it - locate the jack/protective pad at the correct point and
raise the car clear of the ramps. Slide the ramps out slightly and carefully lower the car. Now lower
the jack and repeat on the other side. Continue lowering each side in turn until the car is resting on
the floor.
- Suitable jack and protective pad (e.g. a piece of wood)
- Two chocks (e.g. house bricks)
- Four ramps
Tools required
Materials required
Remove the dipstick and wipe the oil from it with clean lint-free cloth/tissue/rag and reinsert it. Remove it again and note the
oil level on the dipstick. The difference between the minimum and maximum marks is quoted at one litre.
Using a suitable funnel top up the oil as appropriate through the oil filler cap located on the top of the
engine.
- Funnel (e.g. old water bottle)
- Clean lint-free cloth/tissue/rag
- Oil (for topping up engine)
![]() The oil level in any car should be checked after the engine has been stopped for at least five minutes to
allow the oil from around the engine to return to the sump.
The oil level in any car should be checked after the engine has been stopped for at least five minutes to
allow the oil from around the engine to return to the sump.
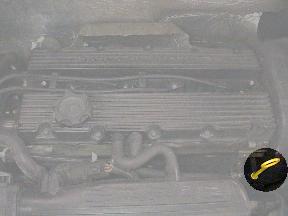 With the car on flat level ground remove the dipstick (it usually has a yellow handle) which is located in the rear right corner of the
engine bay and the lower right corner of the photograph.
With the car on flat level ground remove the dipstick (it usually has a yellow handle) which is located in the rear right corner of the
engine bay and the lower right corner of the photograph.
![]() If the oil has just been changed it is possible that it had not all returned to the sump giving an
articially low reading on the dipstick. In this situation it is better to ensure that the level is above the
minimum mark and then allow the engine to run for a short while to warm the oil. Then perform the process
above to check the level more accurately.
If the oil has just been changed it is possible that it had not all returned to the sump giving an
articially low reading on the dipstick. In this situation it is better to ensure that the level is above the
minimum mark and then allow the engine to run for a short while to warm the oil. Then perform the process
above to check the level more accurately.